Introduction
To further study electromagnetic interactions, I will build a simple electric motor.
The following experiment is based off of this project, which I slightly altered.
The following experiment is based off of this project, which I slightly altered.
Objective
To make a simple electric motor.
Materials

- 1.5 volt electric cell ("battery") of size "D"
- Insulated 22G magnetic wire
- 2 large-eyed, long, metal sewing needles (the eyes must be large enough to fit the wire through)
- I used large safety pins instead.
- Modeling clay
- Electrical tape
- Wire cutters
- Small circular magnet
- Mine wasn't strong enough, I discovered, so I found a stronger, cylindrical magnet.
- Thin marker
Procedure
1. Starting in the center of the wire, wrap the wire tightly and neatly around the marker 30 times.
2. Slide the coil you made off the marker.
3. Wrap the loose ends of the wire around the coil a few times to hold it together, then point the wires away
from the loop, as shown in Figure 1. What is this? What is its purpose?
- The coil we created is acting as the armature (the rotating coil of an electromotor),
its job is to carry current from one terminal of the battery to the other, creating
a closed circuit. This flowing current induces a magnetic field, which then
interacts with the magnet.
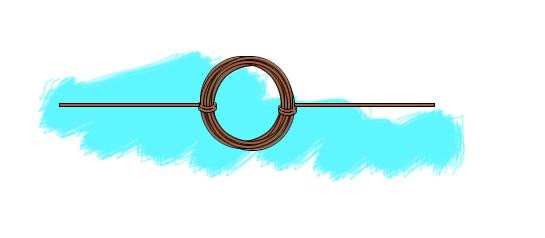
Figure 1
4. Using the wire cutters, remove the top half of the wire insulation on each free end of the coil. The exposed
wire should be facing the same direction on both sides, as demonstrated in Figure 2. Why do you think half
of the wire needs to remain insulated?
- If the current was always traveling through the armature, it would constantly have
a magnetic field and would always be attracted to the magnet. If we strip only
half of the wire, once the armature starts spinning, there's a periodic break in
the connection. This allows the magnetic forces to come into play only at the
convenient times where the coil is in a good position to be repelled. It basically
acts as an on/off switch, to turn the electromagnet on and off.

Figure 2
5. Thread the loose end of the wire coil through the safety pin/large eye of a needle, like Figure 3. Try to
keep the coil as straight as possible without bending the wire ends.
keep the coil as straight as possible without bending the wire ends.
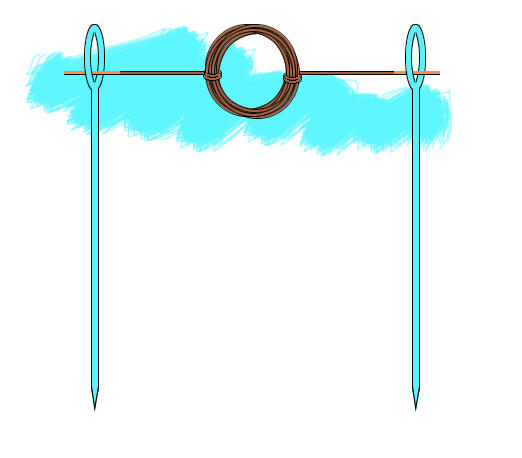
Figure 3
6. Lay the D battery sideways on a flat surface.
7. Stick some modeling clay on either side of the battery so it does not roll away.
8. If using needles, make 2 small balls of modeling clay and cover the sharp ends of each needle.
9. Place the safety pins/needles upright next to the terminals of each battery so that the side of each safety
pin/needle touches one terminal of the battery, akin to Figure 4.
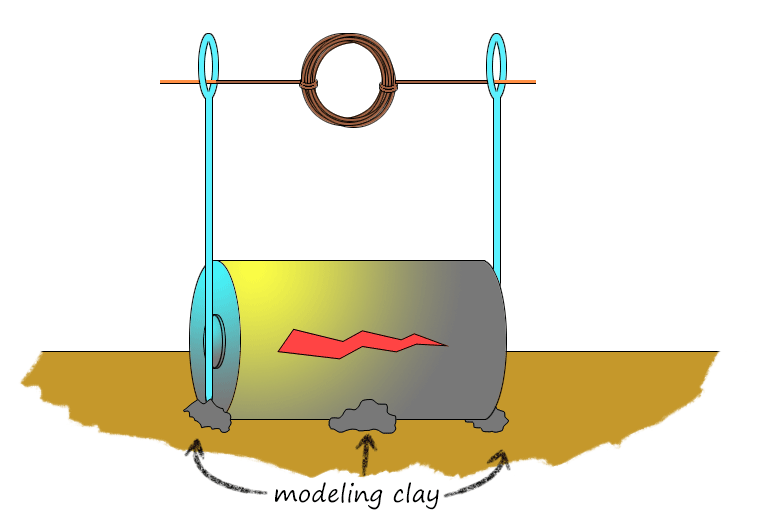
Figure 4
10. Use electrical tape to secure the safety pins/needles to the ends of the battery. Your coil should be
hanging above the battery.
11. Tape the small magnet to the side of the battery so that it is centered underneath the coil, as
shown in Figure 5.
hanging above the battery.
11. Tape the small magnet to the side of the battery so that it is centered underneath the coil, as
shown in Figure 5.
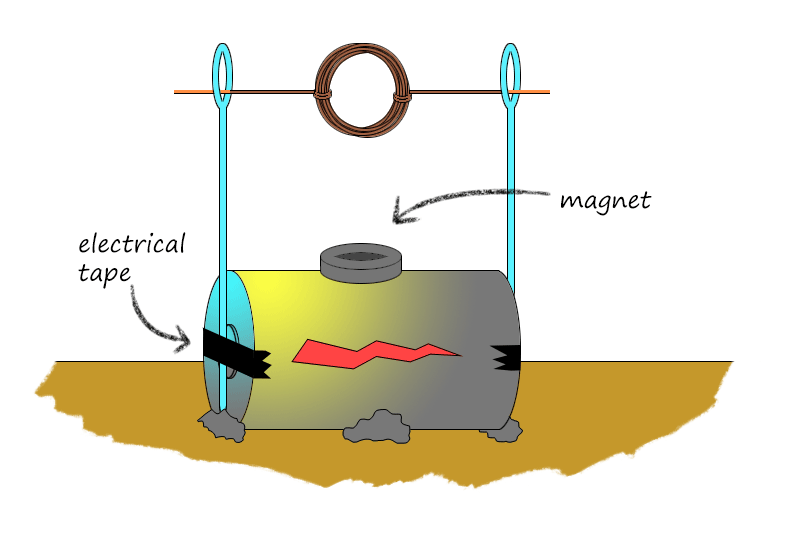
Figure 5
12. Give your coil a spin! What happens? What happens when you spin the coil in the other
direction? What would happen with a bigger magnet? A bigger battery?
- After I give the coil a jumpstart, it continues spinning on its own! This only works
in one direction, however; spinning in the wrong direction would cause the
magnetic fields to attract to each other, instead of repel. A bigger magnet would
cause the coil to spin even faster, and a bigger battery would mean it would spin
for longer.
Analysis
It took a lot of fiddling, but I finally managed to get the motor to work. A problem I discovered with my particular wire was that it was quite difficult to scrape the insulation off; the insulation was a coating on the wire, not a rubber layer.
In order for me to get this motor working, I needed to find a stronger magnet. Instead of the "small circular magnet" suggested by the base experiment, I replaced it with a cylindrical magnet and stuck it off to the side.
Other than that, it worked well! All the motor needed was a little push and some adjustments to the magnet placement, and we were off.
